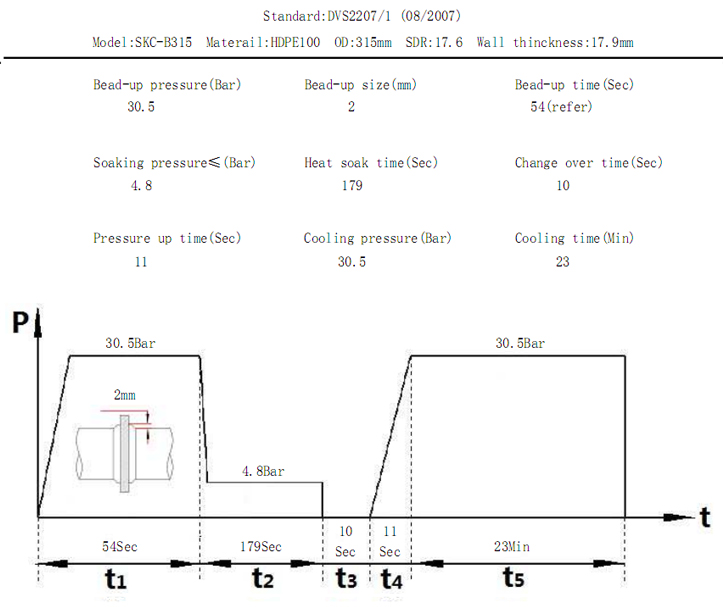
| SKC-B315 operation process reference,diameter is 315mm, thickness is 17.9mm, material HDPE100 |
| Replacement
site, the
necessary
checks by
the operator
or the next
day after
construction |
1 |
Check the diameter of pipe =φ315mm,thickness 17.9mm. |
| 2 |
Check the model of butt fusion machine is SKC B315. |
| 3 |
Fixture the insert clamp suitable for φ315mm. |
| 4 |
Slightly loosen the control box on the pressure relief handle counterclockwise. |
| 5 |
Plug in the hydraulic quick coupling, make sure the hydraulic control parts reliable connection
with the basic frame and hydraulic unit |
| 6 |
Plug in the heating plate quick coupling, make sure the heating plate conncet with the
hydraulic unit. |
| 7 |
Connect the cutter power cord. |
| 8 |
Check control tank if there were enough hydraulic oil or not, otherwise, please fill in order to
start the machine. |
| 9 |
Check the control box power switch is in the closed position to connect the power cord of the
machine outside.Be sure connect grounding wire reliably reliable connect grounding wire. |
| 10 |
Connected to the main power, check voltage meter value whether in machine nameplate
marked voltage range or not. Otherwise, forbid to start the machine. |
| 11 |
Instantaneous push forward the reversing handle,and observe the control box on the motor
fan turned counterclockwise rotation. Otherwise, change the total power phase. |
| Preparation
before
welding |
1 |
Check or set heating plate temperature: 206. Set methods are detailed in the machine's ℃
operation manual. |
| 2 |
Check or set soaking time (t ): 179 seconds. Set methods are detailed in the machine's
operation manual. |
| 3 |
Check or set cooling time (t ): 1365 seconds. Set methods are detailed in the machine's
operation manual. |
| Welding
process |
1 |
Pull back the reversing handle, open the basic frame. |
| 2 |
Clamp correctly and reliably pipe to be welded, and place the corresponding bracket to make
the pipe and rack in parallel. |
| 3 |
Tighten the pressure handle clockwise. |
| 4 |
Unscrew the pressure regulating valve handle in anti clockwise direction. |
| 5 |
Placed the cutter in between the 2 pipes and press cutter operation switch, keep the cutter
running. |
| 6 |
Push forward the reversing handle and maintain. |
| 7 |
Slowly to adjust the pressure regulator handle clockwise until the rack start moving. |
| 8 |
When the pipe with the cutter contact, observing cutting continuous release the reversing
handle,open the pressure relief in anti clockwise direction |
| 9 |
Wait for 2~3 seconds, pull back the reversing handle, open the basic frame. |
| 10 |
Stop the planing tool operate, and place it in the support. |
| 11 |
Unscrew the pressure regulating valve handle in anti clockwise direction. |
| 12 |
Push forward the reversing handle and maintain. |
| 13 |
Slowly adjusted clockwise pressure regulating valve handle, until the basic frame start
moving.And record the basic frame in the process of moving the value of the pressure gauge
(Pt) |
| 14 |
Check the misalignment when the two side pipe connect, the misalignment should be less
than 2mm. Otherwise, adjust the clamp nut tightening or loosening. |
| 15 |
Check the maximum gap between pipes should be less than 0.5mm, otherwise, return step 4
to milling. |
| 16 |
Push forward the reversing handle and maintain. Continue to tighten the pressure regulating
valve and pressure gauge value reached 30.5 Bar + drag pressure ( Pt ) value. |
| 17 |
Pull back the reversing handle, open the basic frame. |
| 18 |
Check the temperature control instrument display whether the temperature reached 206 ℃
nearby and has been maintained for at least 10 minutes. Otherwise, please wait. |
| 19 |
Placed the heating plate between the pipe be welded. |
| 20 |
Push forward the reversing handle folding basic frame and maintain,until the bead height
reaches 2mm or beading time reaches 54(refer) seconds. |
| 21 |
Loosen the reversing handle, slightly counterclockwise unscrewing a pressure relief valve
handle, at the same time, to observe the pressure gauge the value to drop to less than the
drag pressure 3, immediately tightened clockwise pressure relief valve. |
| 22 |
Press the t timing button, wait timer alarm. |
| 23 |
When the soaking time, the machines will be sent in advance " Di, Di, Di " short alarm. At this
time, be prepared to remove heating plate and operate basic frame. |
| 24 |
Observation of the timer to count down to 0, immediately pull back the reversing handle open
frame, at the same time, remove the heating plate and immediately push forward the
reversing handle folding frame, and maintain. |
| 25 |
Press t timing button, and maintain the reversing handle in the forward position of 2~5 minutes, loosen
the reversing handle. |
| 26 |
At this time, the pipe is in holding pressure cooling stage, the operator should observe the value of the
pressure gauge. |
| 27 |
When the value of the pressure gauge decreased more than 1.5 Bar, please push forward the reversing
handle, fill pressure. |
| 28 |
When the cooling time is reached, the machine will give a "Di " long alarm. |
| 29 |
Loosen the relief valve handle counterclockwise,so that the value of the pressure gauge to zero,
pressure relief. |
| Note |
After step 25 , do not pull reversing handle backward , otherwise, it will not be able to weld
pipe qualified! |
| Welding
finished |
1 |
Loosen the pipe, completely welding. |